Tuesday, December 17, 2013
Simple Nicad Battery Charger
This simple charger uses a single transistor as a constant current source. The voltage across the pair of 1N4148 diodes biases the base of the BD140 medium power transistor. The base - emitter voltage of the transistor and the forward voltage drop across the diodes are relatively stable. The charging current is approximately 15mA or 45mA with the switch closed. This suits most 1.5V and 9V rechargeable batteries. The transformer should have a secondary rating of 12V ac at 0.5amp, the primary should be 220/240volts for Europe or 120volts ac for North America.
Simple Nicad Battery Charger Circuit diagram :

WARNING: Take care with this circuit. Use a voltmeter to observe correct polarity. Nicads can explode if short circuited or connected with the wrong polarity.
Saturday, October 5, 2013
Battery Switch With Low Dropout Regulator
 The IC will switch over to the backup battery when it detects that the pass transistor for the main voltage input is in danger of no longer being able to maintain the required output voltage. The device then smoothly switches over to the backup battery. The open-drain status output BACKUP goes low to indicate when this has occurred. When neither battery is able to maintain the output voltage at the desired level the open-drain output DROPOUT goes low. The LT1579 can operate with input voltages of up to +20 V from the batteries. The regulator output OUT is short-circuit proof. The shutdown input switches off the output; if this feature is not required, the input can simply be left open.
Thursday, August 1, 2013
Battery Powered High voltage Generator Circuit Diagram

Friday, April 5, 2013
Ultra Fast Battery charger circuit
- Autoshut-off, is the ability of the charger to stop charging current to a NiCad battery if the capacity NiCad battery is fully charged.
- Polarity Protection, with the existence of this capability so if there are mounting the battery on the charger upside yan can be known.
- Constant output voltage
- Output currents enough to fill some NiCad batteries at once in parallel.
- Short Circuit Protection, with the existence of this protection circuit so if there is short-circuit caused by a battery and a charger circuit itself will not damage the other parts are not damaged.
- Series Ultra Fast Battery Chager for Nickel-Cadmium battery cells [NiCad]

Wednesday, April 3, 2013
Automotive Voltage Indicator Monitors battery voltage Three LED Display
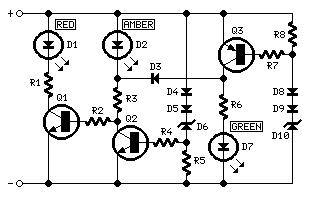
Parts:
R1,R3,R6________1K   1/4W Resistors
R2____________100K   1/4W Resistor
R4,R5,R7,R8_____3K3  1/4W Resistors

D1__________Red LED (Any dimension and shape)
D2________Amber LED (Any dimension and shape)
D3,D4,D5_____1N4148   75V 150mA Diodes
D6_________BZX79C10   10V 500mW Zener Diode
D7________Green LED (Any dimension and shape)
D8,D9________1N4148   75V 150mA Diodes
D10________BZX79C12   12V 500mW Zener Diode

Q1,Q2_________BC547   45V 100mA NPN Transistors
Q3____________BC557   45V 100mA PNP Transistor
Comments:
Connecting this circuit to the battery of your vehicle, you will always know at a glance the approximate voltage available.An
indication of battery voltage is useful to the motorist for
monitoring the batterys capacity to deliver current, and as a check on
the efficiency of the dynamo or alternator.
Threshold voltages of
the LEDs are set by means of two Zener Diodes (D6 & D10) plus two
further Diodes wired in series (D4, D5 and D8, D9 respectively) adding
a step of about 1.3V to the nominal Zener voltage.
LED indication:
- Red LED D1 is on when battery voltage is 11.5V or less. This indicates a low battery charge.
- Amber
LED D2 is on when battery voltage is comprised in the 11.5 - 13.5V
range. This indicates that the battery is good if the motor is off.
When motor is running, this indicates no charge from dynamo or
alternator. - Green LED D7 is on when battery voltage is 13.5V or
more. This indicates a normal condition when motor is running and
dynamo or alternator are charging.
source: redcircuits.com